Writing with the Camera in Mind: Cinematic Techniques for Framing AI Images in Your Questas Scenes

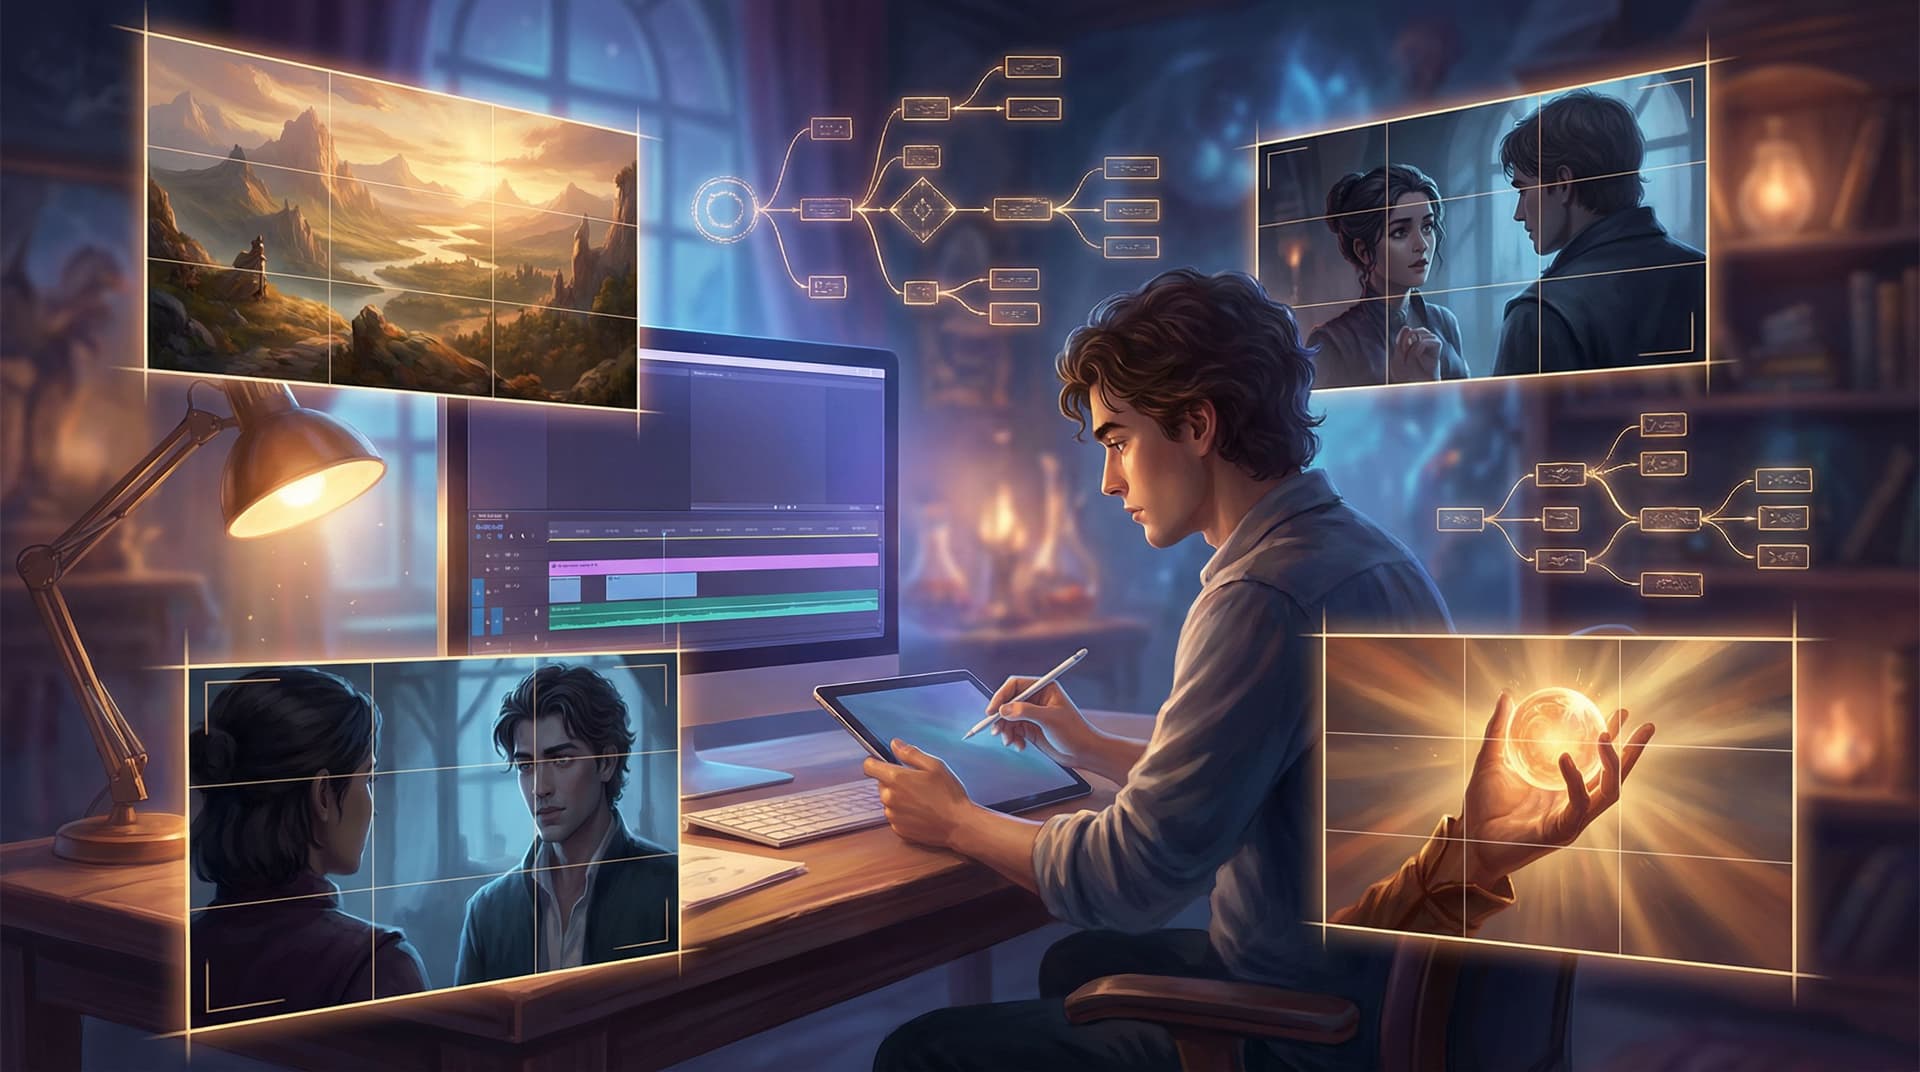
Interactive stories don’t just live in words anymore. When you’re building in Questas, every node can become a “shot” — a framed moment that tells the player what to feel before they even read a line of text.
That’s why thinking like a director, not just a writer, is such a powerful shift.
When you write with the camera in mind, you:
- Make choices feel clearer and more emotional
- Turn routine nodes into memorable “story beats”
- Use AI images and video as storytelling tools, not just decoration
- Keep your branching structure visually coherent, even as it grows
This post is a practical guide to borrowing cinematic techniques and applying them directly to your Questas scenes — from shot types and camera angles to composition, depth, and continuity.
We’ll stay grounded in things you can actually do inside your projects: how to phrase prompts, how to plan a sequence of images, and how to keep your visuals from fighting your text.
Think in Shots, Not Just Scenes
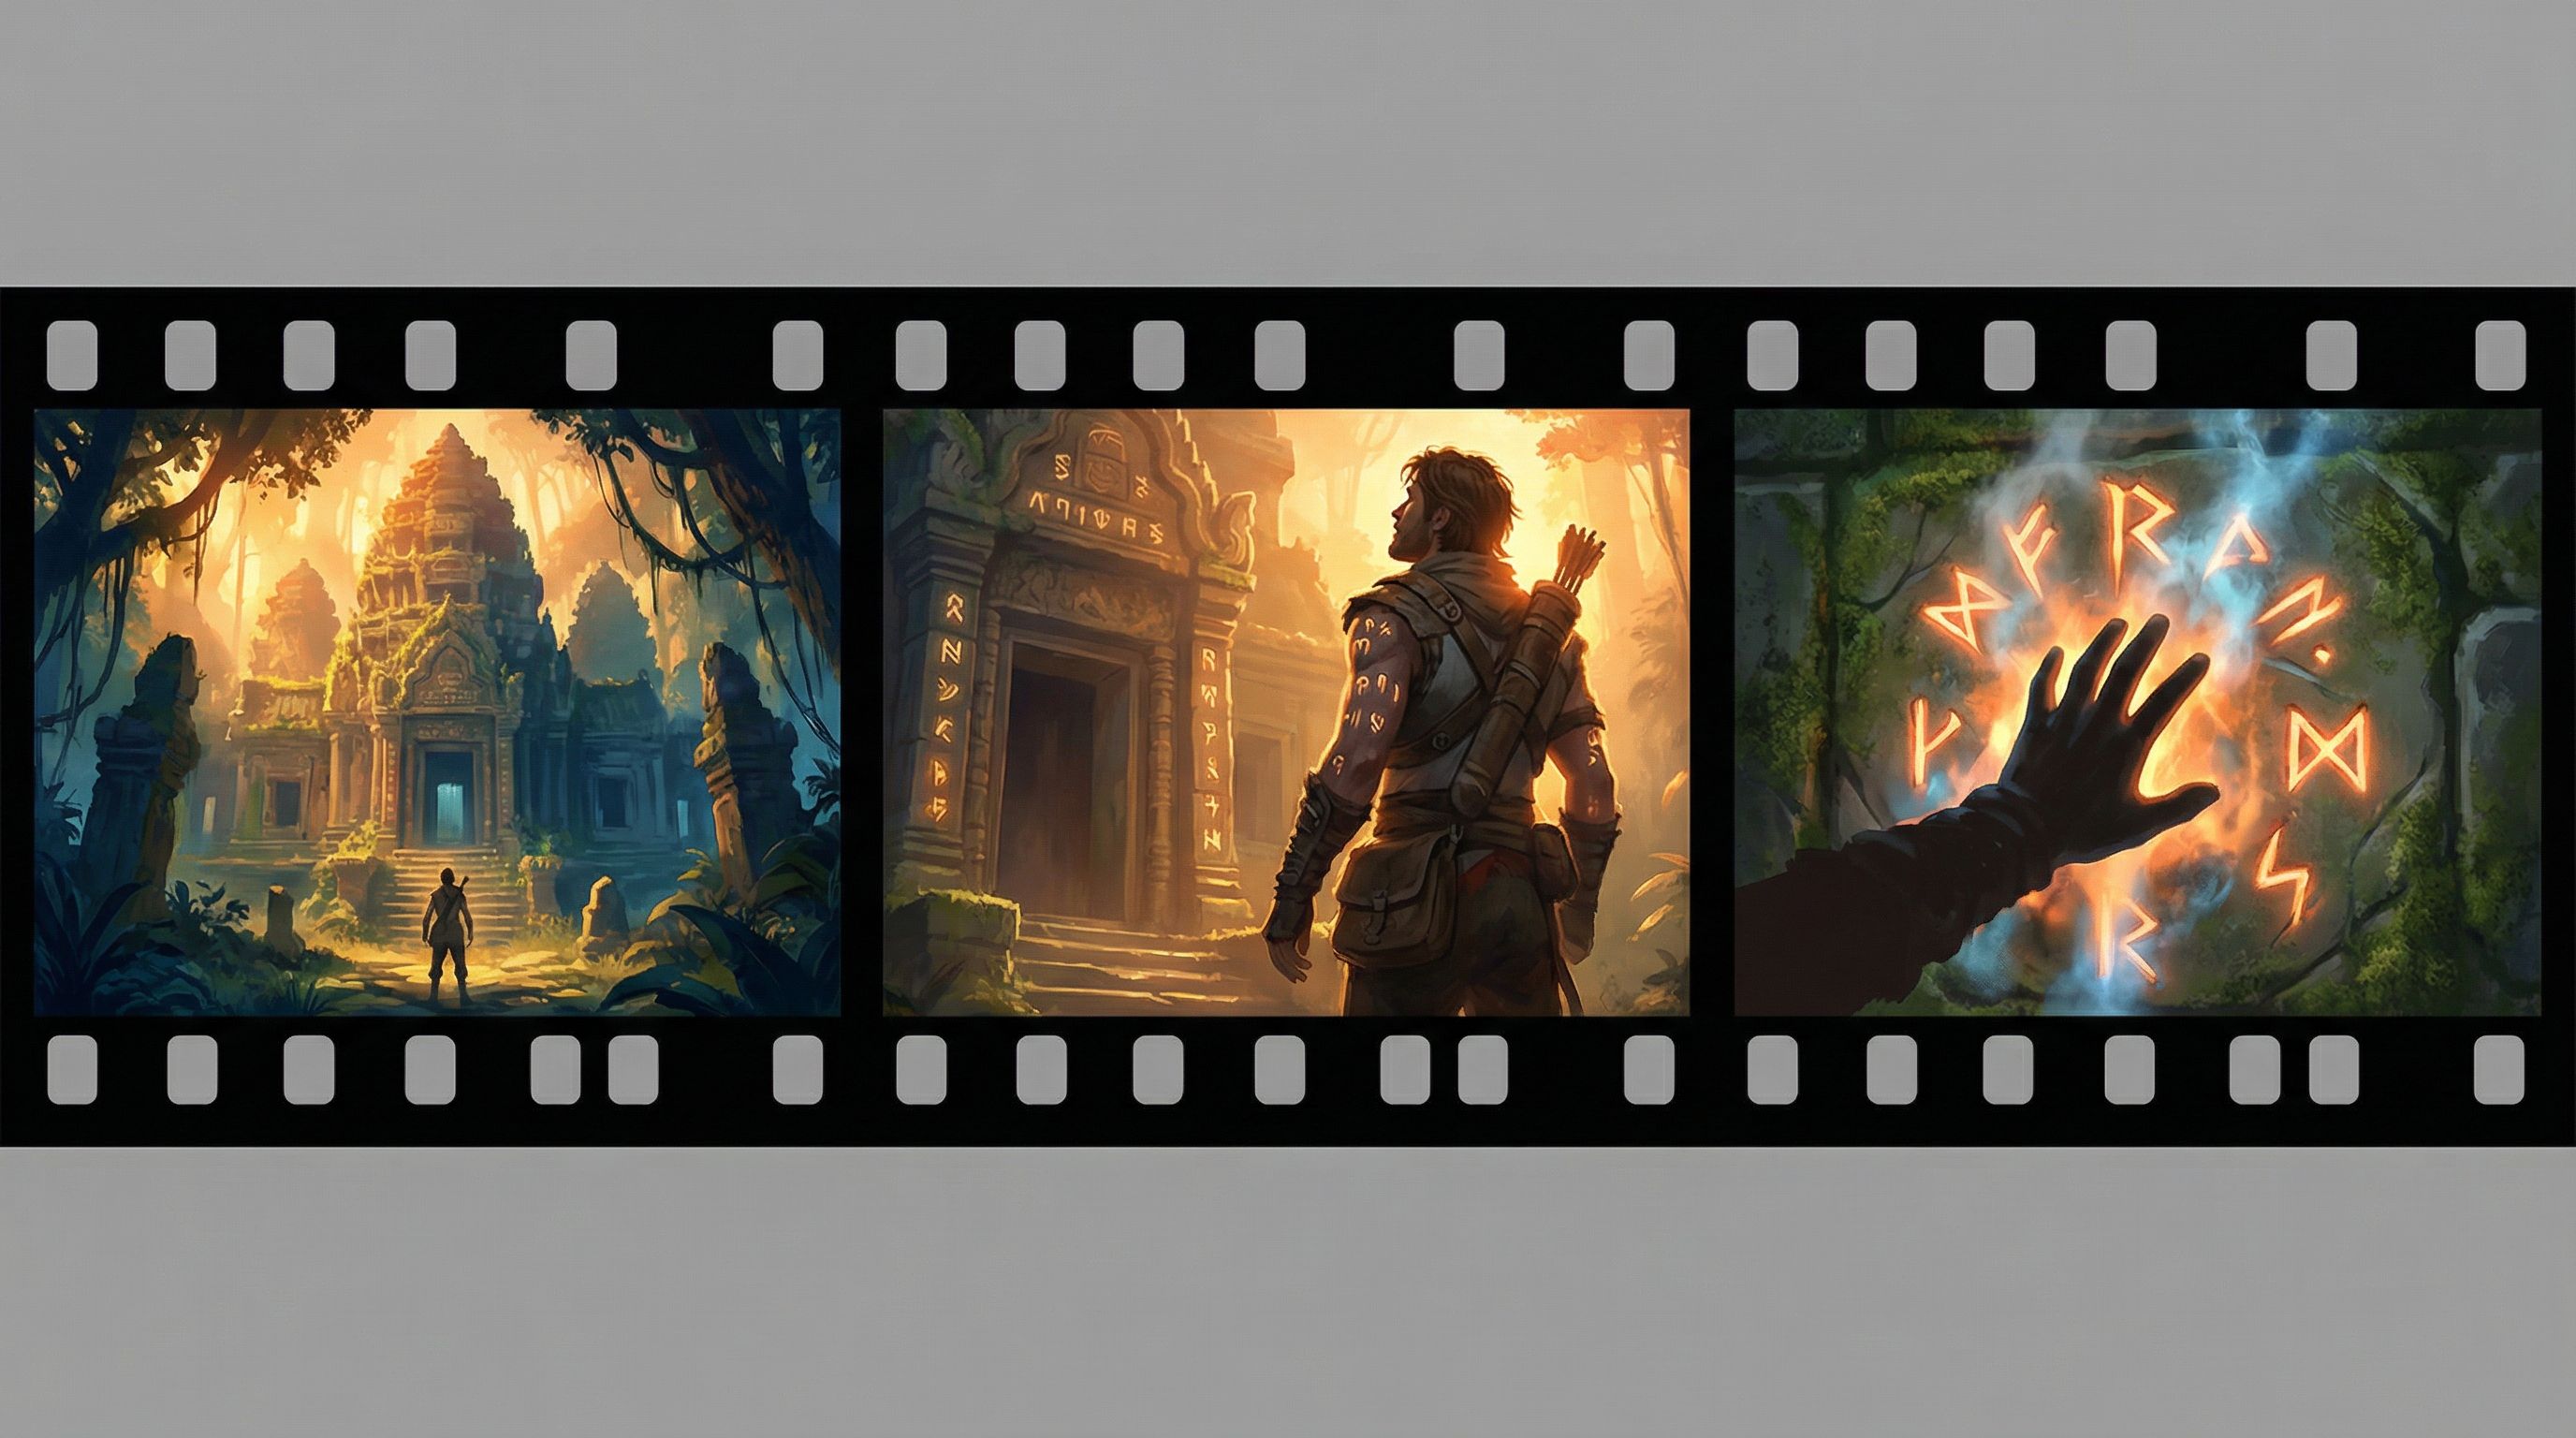
Most creators already think in scenes: “The hero arrives at the ruined temple.” But directors break that moment into shots:
- A wide establishing shot of the temple in the jungle
- A medium shot of the hero hesitating at the entrance
- A close-up on their hand brushing ancient carvings
You can do the same in Questas, even if you’re only generating a single image per node.
A simple mental model
For each node, ask two questions:
-
What is the story beat here?
- Is this about where we are (location)?
- What is happening (action)?
- How someone feels (emotion)?
-
What shot type best serves that beat?
- Establishing / wide shot – orient the player in space and stakes
- Medium shot – show interaction, body language, relationships
- Close-up – highlight emotion, detail, or a crucial object
Then bake that choice into your AI prompt and node design.
Example:
Instead of:
“Generate an image of a ruined temple in the jungle.”
Try:
“Cinematic wide establishing shot of a ruined stone temple half-swallowed by jungle vines, tiny lone explorer at the bottom of the frame for scale, moody overcast light, high contrast, 16:9.”
You’ve just made a director’s choice, not just a description.
Use Shot Types to Shape Player Experience
Different shots create different feelings. You can use them strategically across branches.
1. Establishing shots: “Where am I and why should I care?”
Use wide shots when you:
- Introduce a new location or timeline
- Kick off a major branch
- Want players to sense scale or loneliness
Prompt ingredients:
- “wide shot,” “long shot,” “aerial view,” “bird’s-eye view”
- Clear subject and environment: “small figure crossing a vast desert under a blood-red sky”
- Aspect ratio: “cinematic 21:9” or “16:9”
Pair these with Questas nodes that introduce new choice clusters or big stakes — similar to how we frame investigative environments in Interactive Brand Journalism: Turning Long-Form Articles into Questas Investigations Readers Can Play Through.
2. Medium shots: Relationships and decisions
Medium shots are your workhorses. They:
- Show characters interacting with each other or the environment
- Make choices feel grounded (“Do I trust this person?”)
- Convey body language and power dynamics
Prompt ingredients:
- “medium shot,” “waist-up shot,” “two-shot of…”
- Action verbs: “arguing,” “whispering,” “offering a contract,” “blocking the doorway”
- Composition hints: “characters centered but slightly off to the right, background blurred city skyline at dusk”
Use medium shots on nodes that contain important choice points — especially where relationships or social dynamics matter.
3. Close-ups: Emotion and detail
Close-ups can:
- Turn a small branch into a memorable moment
- Highlight clues or objects that matter later
- Make internal conflict visible (eyes, hands, subtle expressions)
Prompt ingredients:
- “close-up,” “extreme close-up,” “focus on hands,” “focus on eyes”
- Detail words: “tear-streaked,” “mud-caked,” “trembling,” “blood-stained letter”
- Depth-of-field: “shallow depth of field, background softly blurred”
Close-ups pair beautifully with emotional forks in Branching Narratives for Therapists and Coaches: Using Questas to Rehearse Tough Conversations Safely, where a single decision carries heavy emotional weight.
Angle Is Emotion: High, Low, and Over-the-Shoulder
Camera angle is your secret weapon for shaping how players feel about a scene or character.
High vs. low angles
- High angle (camera looking down):
- Makes the subject feel small, vulnerable, or overpowered
- Great for moments where the player is out of their depth
- Low angle (camera looking up):
- Makes the subject feel powerful, threatening, or mythic
- Perfect for villains, authority figures, towering structures
Prompt patterns:
- “low-angle shot looking up at a towering corporate skyscraper, protagonist tiny in the foreground”
- “high-angle shot from ceiling corner, lone student at desk surrounded by exam papers, harsh fluorescent light”
Over-the-shoulder (OTS): Instant immersion
Over-the-shoulder shots put the player inside the protagonist’s body.
Use OTS when you:
- Want the player to feel personally addressed
- Present dialogue choices or negotiations
- Show interfaces (laptops, control panels, spellbooks) they’re about to interact with
Prompt pattern:
“Over-the-shoulder shot from behind a knight in worn armor, looking toward a dragon coiled around a castle gate, misty valley below, dramatic backlighting.”
Then align your Questas choices directly under that image so it feels like the next line in the conversation.
Composition: Guiding the Player’s Eye
Cinematographers obsess over composition because it quietly tells the viewer what matters. You don’t need art school to borrow the basics.
Use the rule of thirds
Imagine your frame divided into a 3×3 grid. Place key elements along those lines or at their intersections.
In prompts, you can literally say:
- “subject placed on left third of frame, city skyline filling right two-thirds”
- “glowing artifact at lower-right intersection of rule-of-thirds grid”
Why it helps:
- Creates balance without boring symmetry
- Leaves space for UI overlays and text boxes
- Feels “cinematic” because it echoes how films and games are framed
Create depth with foreground, midground, background
Flat images feel like posters. Layered images feel like worlds.
Prompt checklist:
- Foreground: “out-of-focus leaves framing the top of the shot,” “silhouette of railings,” “protagonist’s shoulder”
- Midground: main action — “two characters arguing by the bar”
- Background: context — “neon signs and rainy street outside the window”
You can phrase prompts like:
“Cinematic shot with strong depth: blurred tree branches in foreground, young mage in midground facing a crumbling tower, distant mountains in hazy background, golden hour light.”
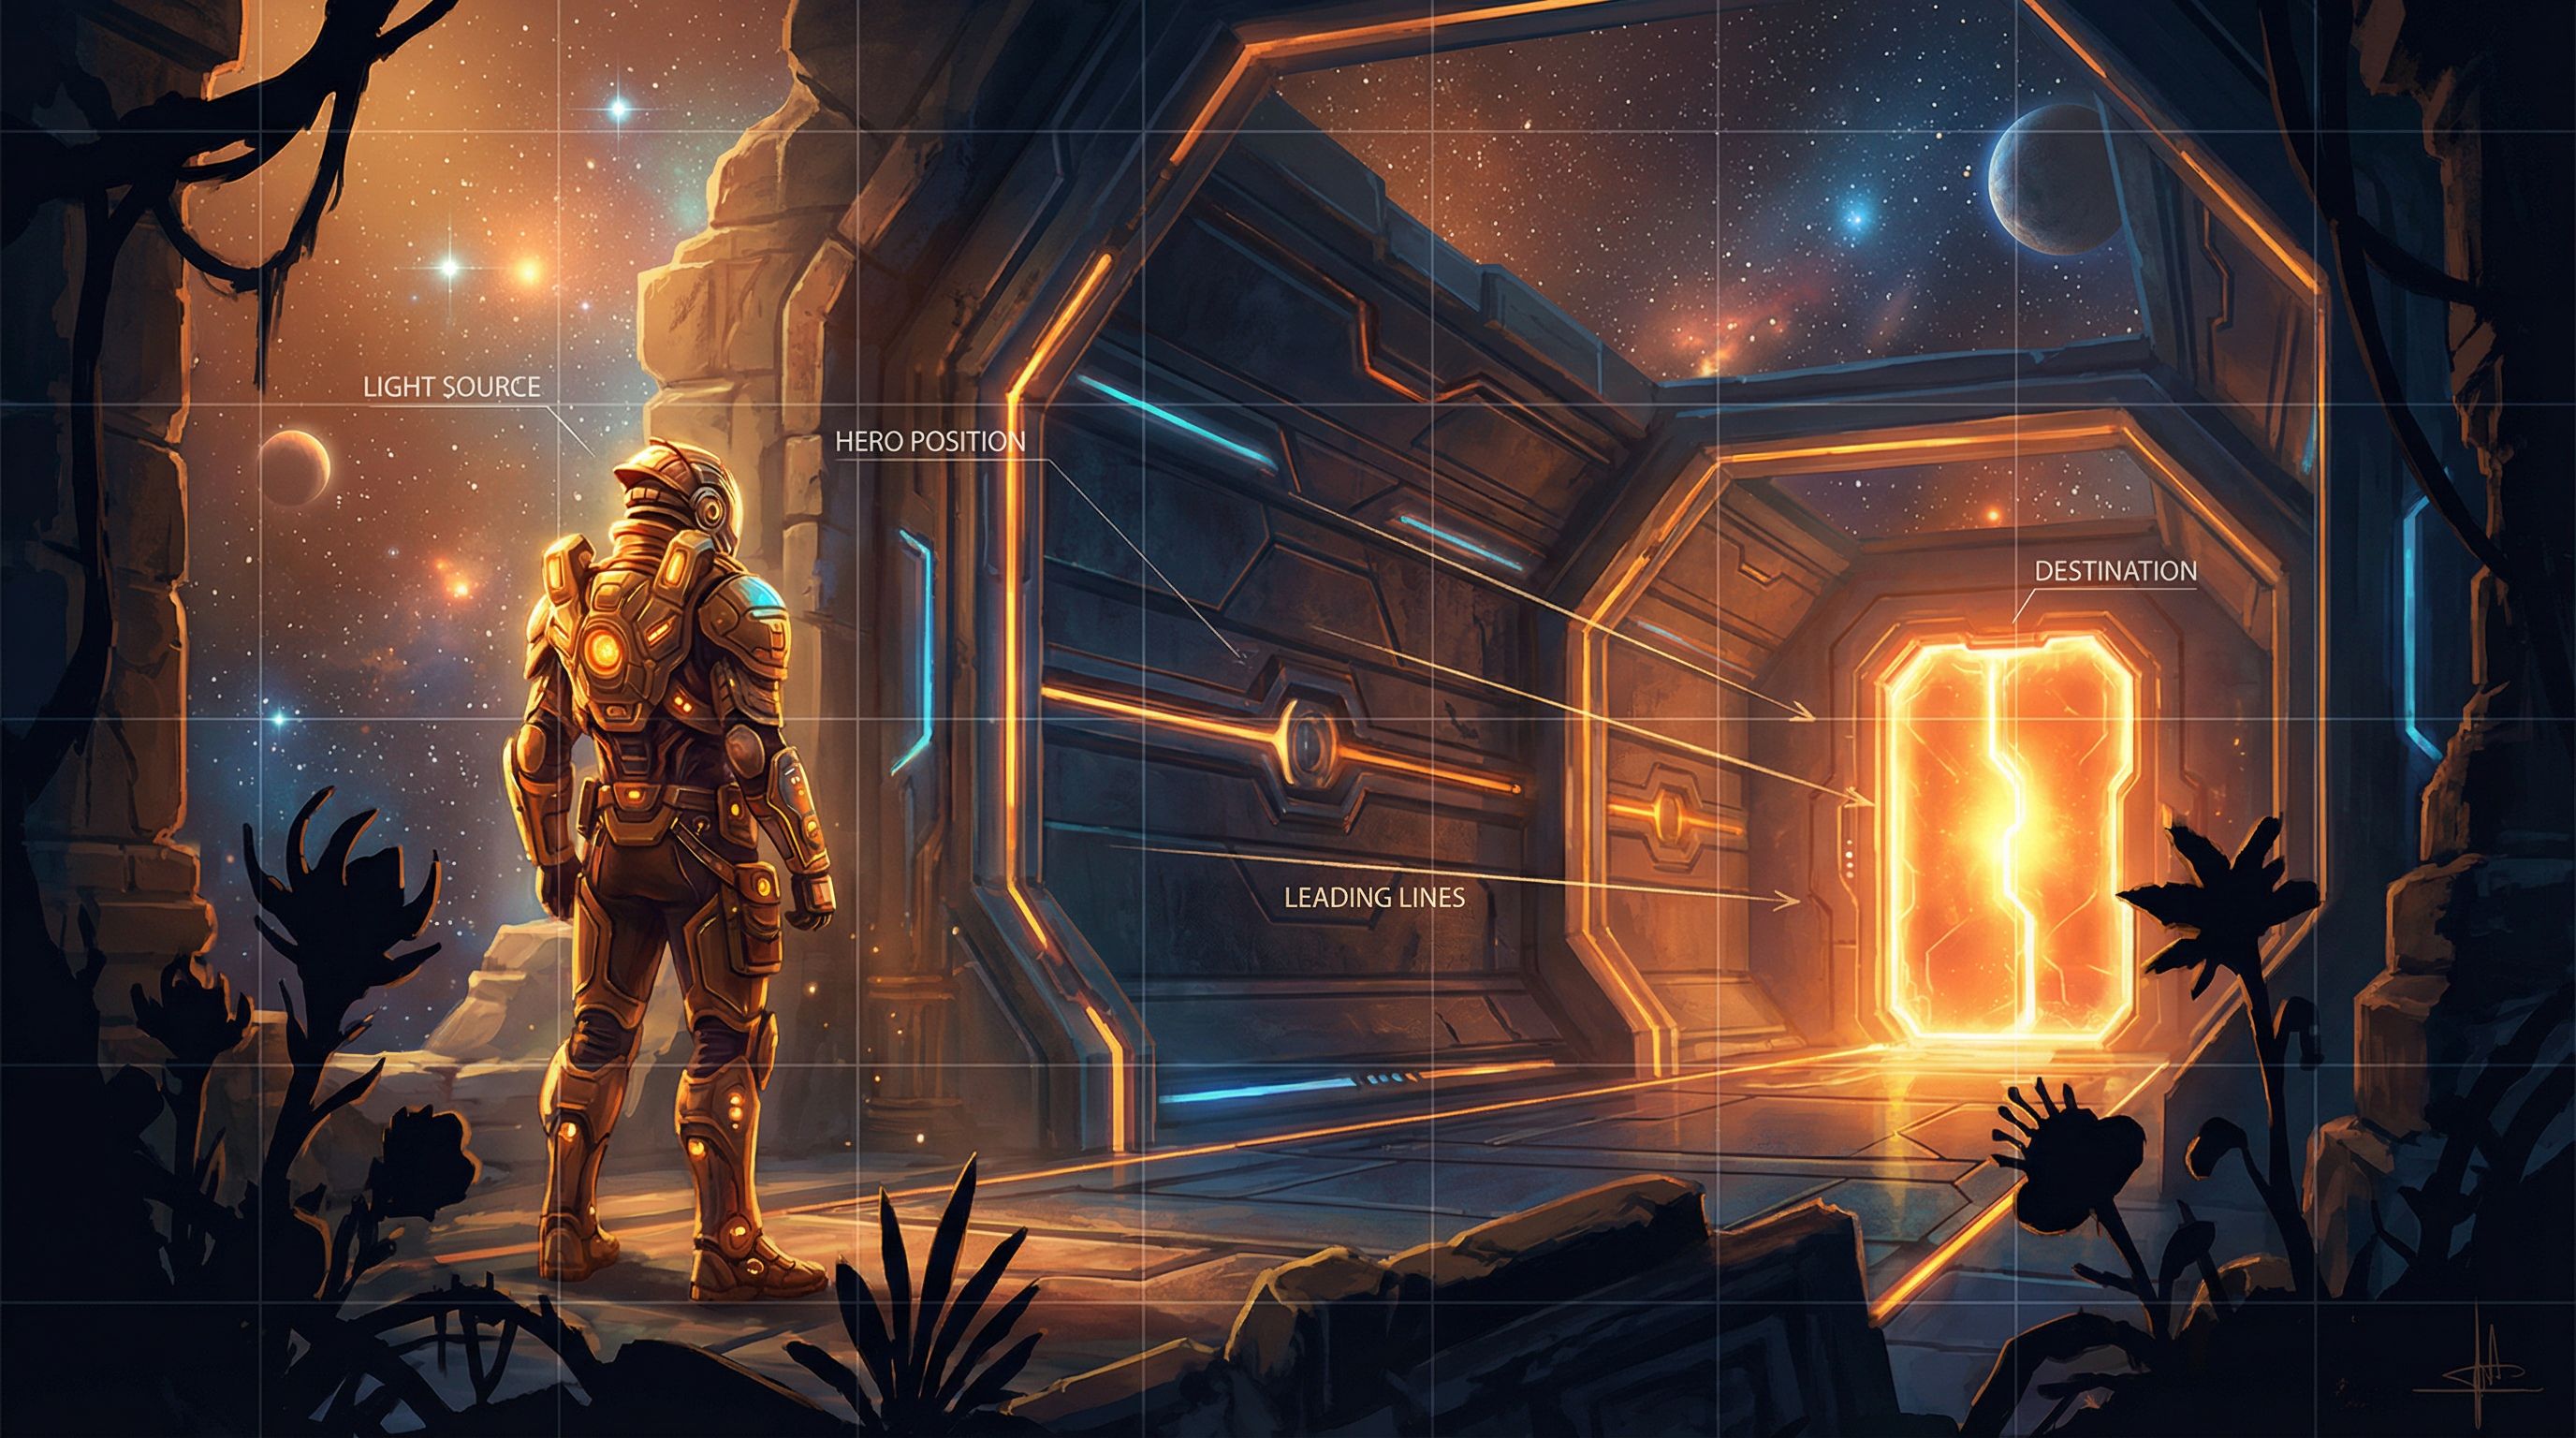
Use leading lines and shapes
Lines in your image can guide the eye toward what matters:
- Roads, hallways, fences
- Beams of light
- Weapon blades, staffs, outstretched arms
Prompt examples:
- “long corridor with converging perspective lines leading to a glowing door at the center”
- “diagonal beam of moonlight pointing toward a hidden chest in the corner”
These tricks make it easier for players to instantly parse what’s important in a node, especially when you’re juggling multiple UI elements.
Matching Image Framing to Choice Design
The most effective Questas scenes treat image framing and choice design as one decision, not two separate tasks.
Here’s how to sync them up.
1. Align framing with the type of choice
- Exploration choices (where to go next)
- Favor wide shots and clear geography
- Show multiple possible paths in the frame: a forked road, three doors, branching corridors
- Relationship choices (who to side with, what to say)
- Use medium shots and OTS to highlight faces and body language
- Moral or internal choices
- Use close-ups and symbolic details (hands, objects, mirrors)
If your node’s choices are “Sneak past the guards” vs. “Confront them,” but your image is a vague landscape, the player’s brain has to do extra work. Reframe the shot so the options are visually implied.
2. Make the focal point echo the most dramatic option
You can subtly nudge players toward a particular branch by making that option the visual focal point:
- Brightest part of the image
- Strongest contrast
- Where leading lines converge
Example node:
Choices:
- “Take the risky shortcut over the rickety bridge.”
- “Stay safe and follow the long path around the gorge.”
Prompt:
“Wide shot of a deep gorge at dusk, rickety wooden bridge lit by a shaft of warm sunlight in the center, safer path in shadow winding along the cliff edge, small traveler hesitating in the foreground.”
The image doesn’t force the risky choice, but it makes it feel like the storyful one.
3. Respect UI and readability
If your Questas theme places text boxes at the bottom, avoid prompts like:
- “Important clue written on the floor at the bottom of the frame.”
Instead, design with UI in mind:
- “Mysterious sigil glowing on the wall at upper center of frame, clear negative space at bottom for text overlay.”
This is especially important if you’re building visually rich experiences like those in AI Visual Storytelling for Non-Artists: A Practical Style Cookbook for Your First 10 Questas Worlds. Composition that fights your interface will tire players out.
Planning Sequences, Not One-Off Images
Cinematic storytelling comes from sequences: how one shot flows into the next.
You can storyboard your Questas branches lightly before you ever open the visual editor.
A quick three-step workflow
-
Thumbnail your key beats
- On paper or a tablet, draw tiny boxes representing your nodes.
- Under each, jot a shot type and angle: “Wide, high angle,” “Medium OTS,” “Close-up on hands.”
-
Map shot variety across a path
- Avoid repeating the same framing five nodes in a row.
- Mix:
- Wide → Medium → Close-up for rising tension
- Medium → Wide for a reveal or release
-
Translate thumbnails into prompts
- Use your notes as the skeleton of each prompt:
- “medium shot, over-the-shoulder, character A facing character B across a cluttered desk, warm lamplight, shallow depth of field”
- Use your notes as the skeleton of each prompt:
This doesn’t have to be elaborate. Even 10–15 minutes of pre-planning can make your images feel like a coherent film instead of unrelated illustrations.
Keeping Visuals Ethical, Clear, and Consistent
Cinematic doesn’t just mean “dramatic.” It also means intentional.
When you start framing characters and worlds with more power, revisit the principles from AI Visual Etiquette: Avoiding Tropes, Stereotypes, and Overload in Image-Heavy Questas Stories:
- Avoid harmful tropes. Low angles on authority figures can be powerful — but be mindful of how you depict marginalized groups, uniforms, or real-world institutions.
- Use repetition for identity, not stereotype. Consistent framing of a protagonist (e.g., recurring OTS shots from behind their shoulder) can build a sense of continuity, but don’t lock secondary characters into one-dimensional visual roles.
- Don’t overload every node. Not every scene needs a complex, multi-character composition. Sometimes a simple, clean close-up is the most cinematic choice.
A few practical guardrails:
- Limit your most visually dense compositions to key moments.
- Reuse visual motifs (same hallway, same office, same rooftop) with different angles to signal narrative callbacks.
- Keep a small style and framing reference board for each project — even just a Notion page or folder of example frames.
Turning All of This into Reusable Questas Patterns
Once you’ve experimented a bit, you can start to build your own “cinematic grammar” inside Questas:
- Default shot per node type
- Intro nodes → establishing wide shot
- Dialogue-heavy nodes → medium or OTS
- Turning points → close-up
- Reusable prompt templates
- Create a few base prompts you can tweak:
- “medium shot, two characters facing each other, [emotion], [location], [lighting]”
- “wide shot of [location], small protagonist in foreground, [weather], [time of day]”
- Create a few base prompts you can tweak:
- Consistent aspect ratios
- Pick one or two aspect ratios for a project and stick to them for a more film-like feel.
If you’re already building ensembles and worlds, you can combine these framing patterns with the character strategies from AI as Casting Director: Designing Reusable Character Ensembles for Multiple Questas Stories (/ai-as-casting-director-designing-reusable-character-ensembles-f) to keep both people and shots feeling coherent across multiple adventures.
Quick Checklist for Your Next Scene
Before you generate your next batch of AI images in Questas, run through this:
- What is the story beat of this node?
- Location, action, or emotion?
- Which shot type fits best?
- Establishing, medium, close-up?
- What angle supports the emotion?
- High, low, eye-level, over-the-shoulder?
- Is the composition guiding the eye?
- Rule of thirds, depth, leading lines?
- Do the visuals echo the choices?
- Are possible actions implied in the frame?
- Will the UI cover anything important?
- Leave safe space where text will sit.
- Does this shot add variety to nearby nodes?
- Are you avoiding five similar framings in a row?
If you can answer those in a sentence or two, you’re already thinking like a director.
Bringing It All Together
Writing with the camera in mind is less about mastering jargon and more about making deliberate visual decisions that support your story and your choices.
When you:
- Break scenes into shots
- Use shot types and angles to shape how players feel
- Apply simple composition tools like the rule of thirds and depth
- Match framing to choice design and UI
- Plan sequences instead of one-off images
…your Questas projects start to feel less like illustrated text and more like playable films or graphic novels.
You don’t need a film degree. You just need the habit of asking, at every node: “If this were a shot, how would I frame it?”
Your Next Step
Pick one existing Questas project — or spin up a tiny new one with 6–8 nodes.
- Choose a single path through that story.
- For each node on that path, decide:
- Shot type (wide / medium / close-up)
- Angle (high / low / eye-level / OTS)
- One composition note (rule of thirds, leading lines, foreground element)
- Rewrite your AI prompts to include those decisions.
- Regenerate the images and play through the path as if you’re watching a short film.
Notice how much more directed it feels — and how much easier it is for players to understand the stakes of each choice.
Then, when you’re ready, bring that same cinematic mindset into your next branching epic on Questas. Your stories already have strong bones; now it’s time to give them a camera that knows exactly where to look.