Camera Moves Without a Camera: Simulating Pans, Zooms, and Cuts with AI Images in Questas

Film directors have a secret weapon that most interactive story creators never touch: camera language.
A slow push-in makes a quiet moment feel intimate. A hard cut shocks the viewer. A tracking shot that glides past details lets the audience discover the world instead of having it explained.
When you’re building interactive stories with AI-generated images, it’s easy to assume you’ve lost that toolkit. You’re not holding a camera. You’re not on a set. You’re working with still frames.
But here’s the twist: with a platform like Questas, you can direct the camera—you just do it in your prompts, your framing, and your scene structure instead of through lenses and rigs.
This post is about how to simulate pans, zooms, and cuts using AI images inside Questas, so your quests feel cinematic and intentional, even though you never touch a physical camera.
Why Camera Language Matters in Interactive Stories
Even if your audience doesn’t know the terms for it, they feel camera decisions:
- A wide establishing shot tells them where they are and what matters.
- A close-up on a trembling hand signals fear without a single line of dialogue.
- A jump cut between two extreme moments makes a choice feel risky or abrupt.
In branching stories, this becomes even more important because:
- You’re constantly re-orienting players. Every branch can be a new location, time, or emotional beat.
- Choices need emphasis. Visual rhythm helps players sense, “This moment is big,” or, “This is a quiet detour.”
- Attention is a scarce resource. Good camera simulation guides the eye to what matters in each scene.
If you’re already experimenting with AI micro-video, you’ve seen how motion can change pacing. Our post on using micro-video for tension, “Storyboard to Screen: Using AI-Generated Micro-Video to Pace Tension and Reveal in Your Questas”, goes deep on that. Here, we’ll stay with still images—and show how far they can take you.
Think Like a Director, Prompt Like a Designer
Before we get tactical inside Questas, it helps to translate a few film concepts into AI-image terms.
1. Shot Types as Prompt Templates
You can think of your core “camera moves” as a small library of prompt patterns:
-
Wide / Establishing
- Prompt language: “wide shot,” “establishing shot,” “seen from afar,” “aerial view,” “long shot”
- Use for: new locations, big reveals, branching points where context matters.
-
Medium / Over-the-Shoulder
- Prompt language: “medium shot,” “over-the-shoulder,” “from behind the character,” “waist-up”
- Use for: conversations, choices, moments where the player should identify with a character.
-
Close-Up / Insert
- Prompt language: “close-up,” “macro shot,” “extreme close-up,” “focus on hands,” “focus on eyes”
- Use for: clues, emotional beats, key objects that relate to choices.
When you generate images inside Questas, bake shot type into the prompt. Instead of:
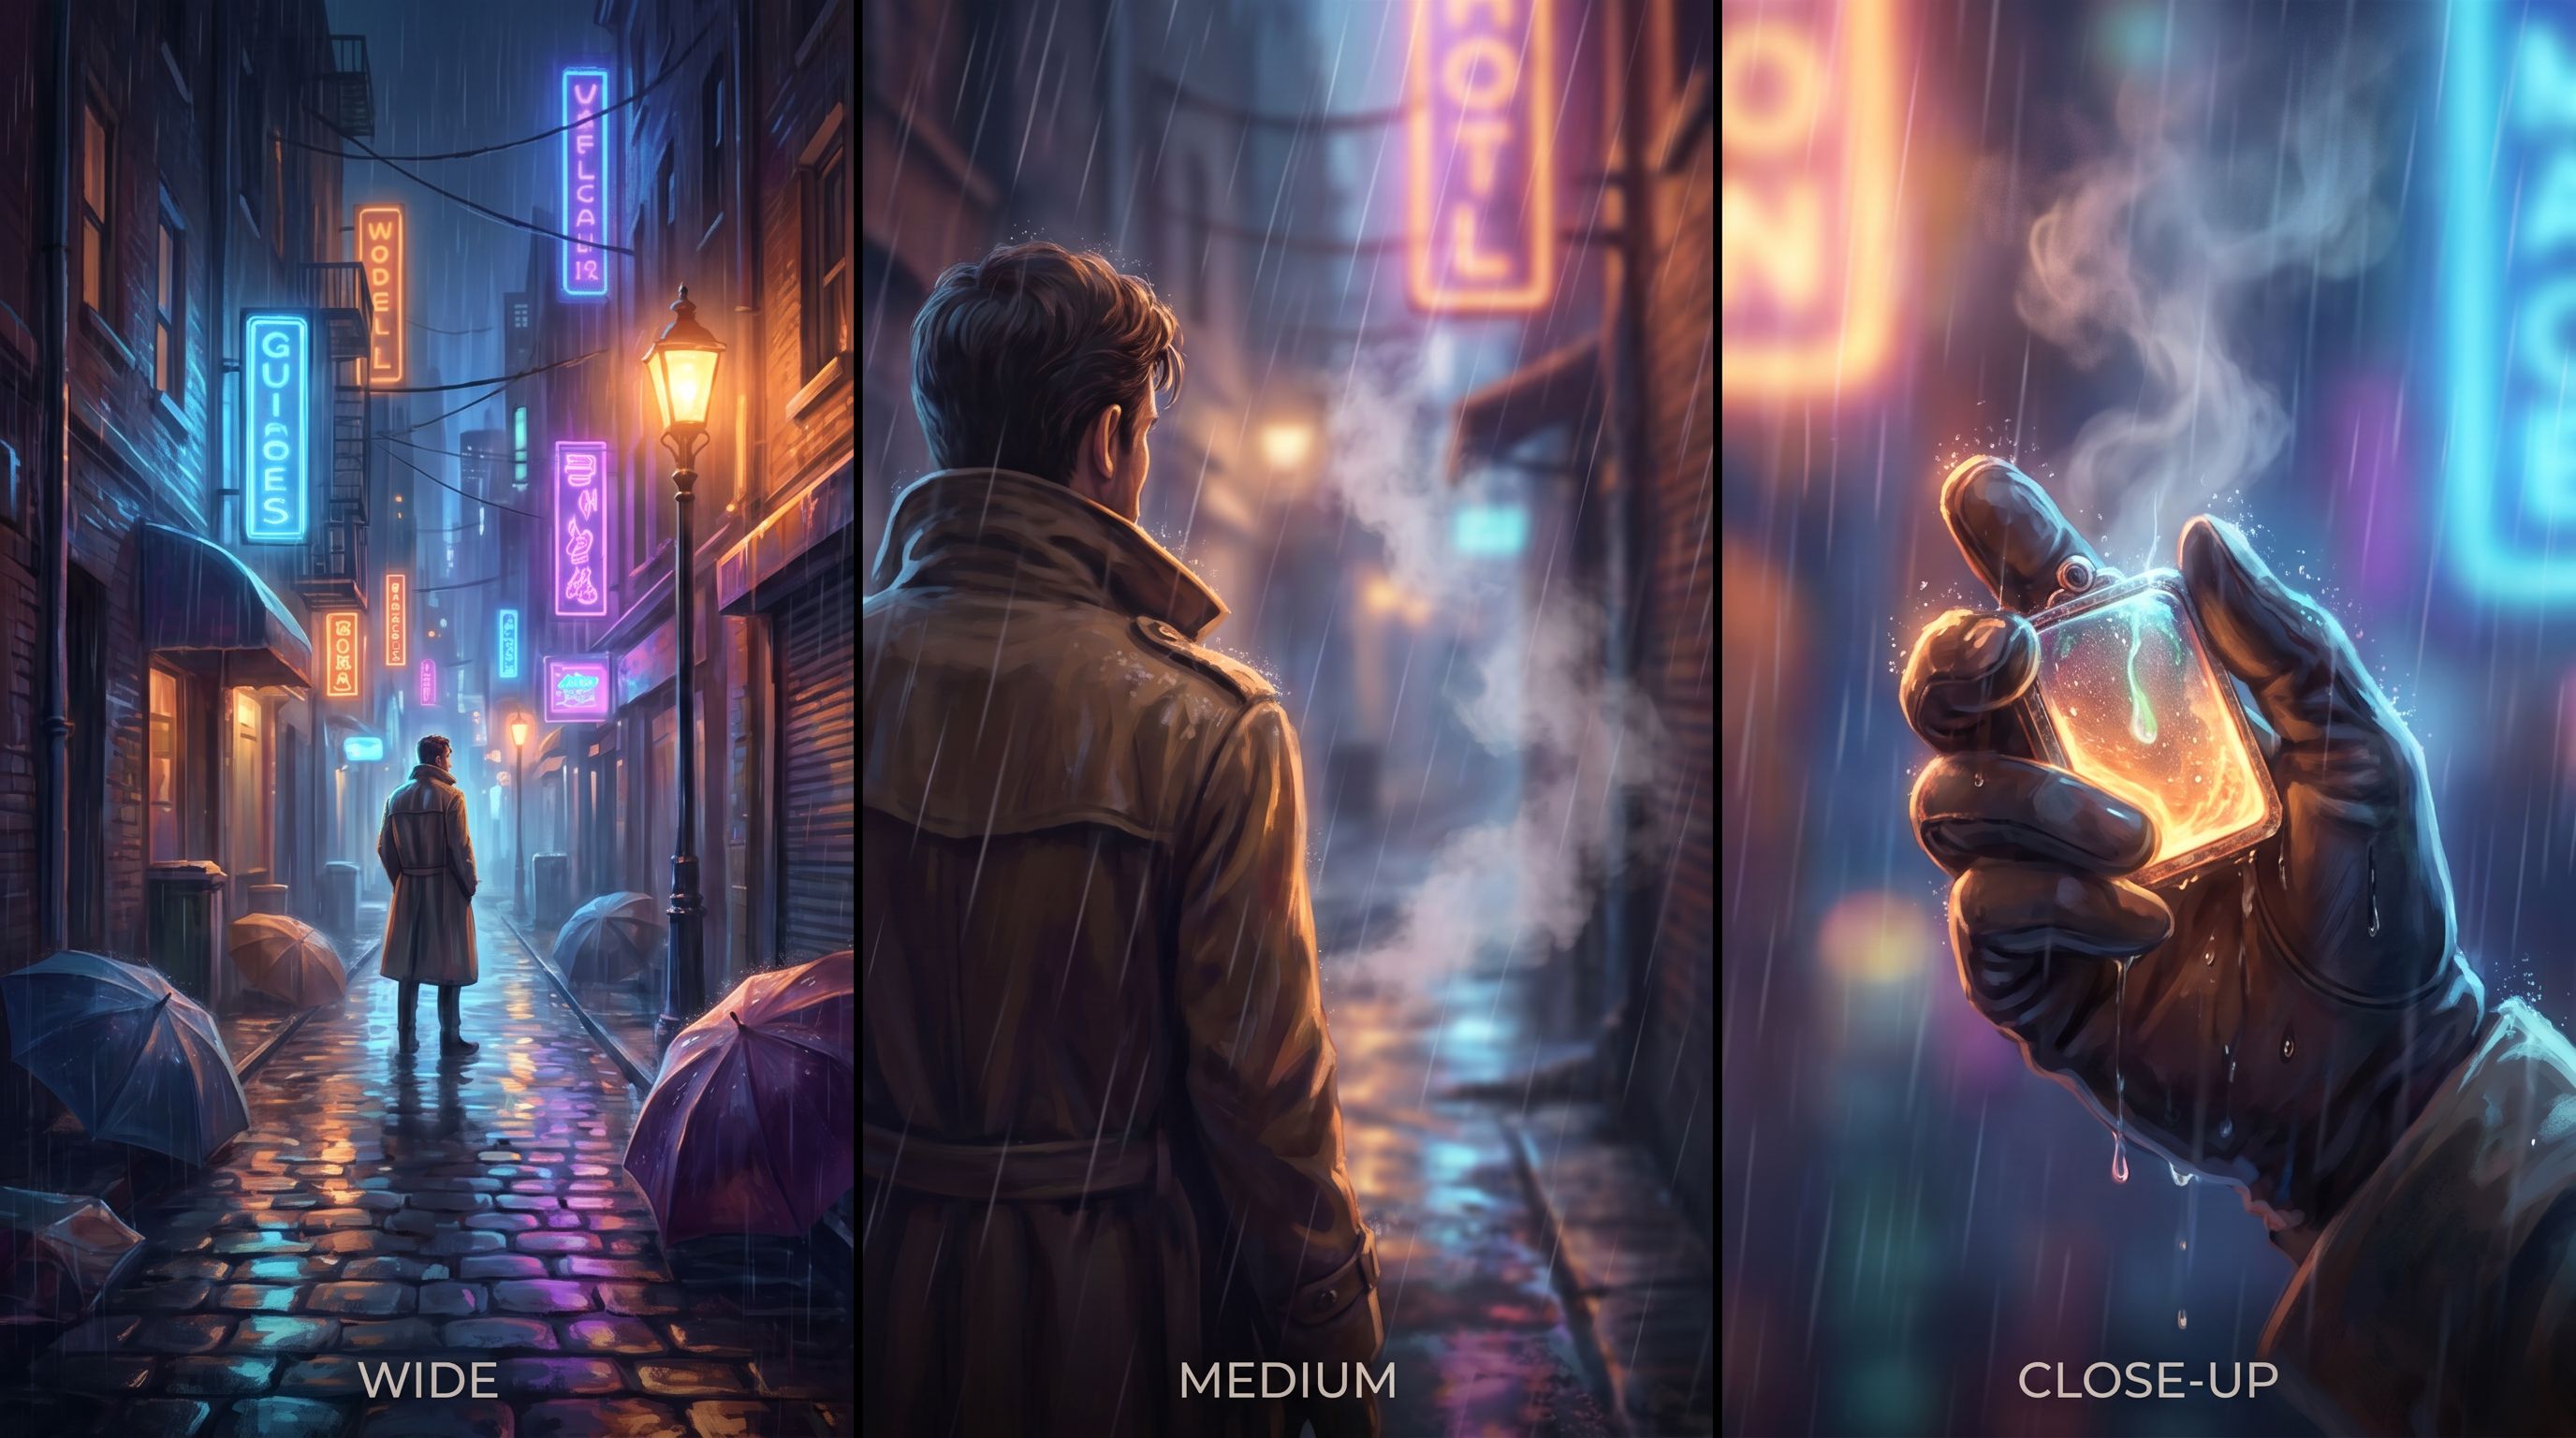
“A detective in a rainy alley, neon lights”
Try:
“Cinematic wide shot of a lone detective standing in a rainy neon-lit alley, viewed from slightly above, city stretching into the distance”
Then, for a later “zoom” on the same moment:
“Cinematic close-up of the detective’s gloved hand gripping a rain-soaked evidence photo, neon reflections shimmering on the wet paper”
Same scene, different “camera.”
Building a Virtual Camera Toolkit Inside Questas
Let’s walk through how to turn these ideas into a repeatable workflow inside Questas.
Step 1: Anchor Your “Master Frame”
Start each major location or scene with one master frame—your mental version of a film set.
-
Choose the angle and mood.
- Is this location intimidating, cozy, chaotic, sterile?
- Are we looking up at a looming tower, or down into a cramped bunker?
-
Generate a strong establishing image.
- Prompt for a wide shot with clear environmental details.
- Example: “Wide establishing shot of a cluttered alchemist’s workshop, shelves stacked with glowing vials, warm candlelight, seen from the doorway at eye level.”
-
Save the key visual concepts.
- Note the style keywords (e.g., painterly, photorealistic, cel-shaded).
- Note dominant colors and lighting (e.g., warm candlelight, teal and orange, harsh fluorescent).
This master frame becomes your reference for all simulated pans, zooms, and cuts in that location.
Step 2: Simulate a Pan with Overlapping Details
A pan is a sideways or vertical movement of the camera. With still AI images, you fake this by:
- Keeping the style, lighting, and time of day consistent.
- Changing what part of the environment we’re looking at.
- Ensuring overlapping visual anchors appear in multiple frames.
For example, from your alchemist’s workshop:
-
Shot A – Left side of the room
- Prompt: “Wide shot of the left side of the same cluttered alchemist’s workshop, focusing on a large wooden workbench piled with ingredients, the same glowing vials visible in the background on shelves, warm candlelight, painterly style.”
-
Shot B – Center, at the workbench
- Prompt: “Medium shot at the central workbench in the same alchemist’s workshop, hands sorting herbs on a stained notebook, the same glowing vials blurred in the background, warm candlelight, painterly style.”
-
Shot C – Right side, mysterious door
- Prompt: “Wide shot of the right side of the same alchemist’s workshop, focusing on a heavy wooden door with strange runes, a few of the same glowing vials visible on a nearby shelf, warm candlelight, painterly style.”
In Questas, you can then:
- Use sequential scenes that visually “scan” across the room as the player clicks through.
- Tie choices to each frame (e.g., Inspect the workbench, Examine the vials, Approach the door).
The player experiences this as the camera gliding through the space, even though it’s just a series of carefully-related stills.
Step 3: Simulate a Zoom with Progressive Cropping
A zoom is about changing scale and focus.
To simulate a zoom:
-
Start wide.
- Use your master frame or a location-wide shot.
-
Generate a medium shot that keeps key landmarks.
- The same character, table, or doorway appears, but closer.
-
Generate a close-up on the object or expression that matters.
- Hands, eyes, a single artifact, a warning on a screen.
Try structuring your prompts as a series:
-
Shot 1 – Wide
- “Wide shot of a starship bridge, crew at their stations, stars visible through the main viewport, cool blue lighting, cinematic.”
-
Shot 2 – Medium
- “Medium shot of the captain at the center of the same starship bridge, viewed from slightly below, crew and starfield blurred in the background, cool blue lighting, cinematic.”
-
Shot 3 – Close-Up
- “Close-up of the captain’s tense hands gripping the armrest of the command chair on the same starship bridge, warning lights reflected on metal, cool blue lighting, cinematic.”
Inside Questas, you can:
- Use the wide shot as the scene intro.
- Use the medium shot for the choice moment.
- Use the close-up as a reaction or consequence frame before branching.
This rhythm—wide → medium → close—is a classic film pattern, and it works beautifully for interactive choices.

Using Cuts to Control Energy and Emotion
If pans and zooms are about movement, cuts are about jumps.
A cut is any transition from one image to another. In interactive stories, you control not just what we cut to, but when—often right after a choice.
Types of Cuts You Can Simulate
You don’t need film school vocabulary to use these patterns, but naming them helps you design with intent.
-
Match Cut – Similar shapes or compositions connect two moments.
- Example: A character’s hand reaching for a door handle → a different door slamming shut in another location.
- Use when you want the story to feel smooth and clever.
-
Smash Cut – A sudden, high-contrast jump.
- Example: Calm, quiet library → sirens and flashing lights in a burning hallway.
- Use when you want to shock or jolt the player.
-
Jump Cut – Same scene, but time has clearly passed or something has changed.
- Example: Empty workshop → same workshop, now a mess with evidence of a struggle.
- Use when you want to skip the boring parts and highlight change.
-
Cutaway – Briefly show something else, then return.
- Example: Character hears a noise → cut to a close-up of a ticking bomb → back to character.
- Use to build tension or show consequences elsewhere.
In Questas, cuts are simply scene transitions. The power comes from:
- How different the two images are.
- Whether the player just made a choice.
- What text bridges the gap (or intentionally doesn’t).
Practical Patterns for Branching Stories
Here are a few concrete patterns you can drop into your next build:
-
“If you choose X, smash cut to…”
- On a reckless choice, immediately jump to a chaotic or high-stakes image.
- Keep dialogue minimal so the visual does most of the work.
-
“Use a match cut to unify branches.”
- Different branches can converge on a shared image that echoes a pose, object, or silhouette from earlier.
- This creates a sense of fate or theme, even as choices diverge.
-
“Jump cut to outcomes, not explanations.”
- Instead of narrating every step, use a jump cut image to show the result of a plan.
- Then let the player deal with that new state.
For more on how these visual decisions affect engagement and replayability, our post on intrinsic motivation loops, “Beyond Badges and Leaderboards: Designing Intrinsic Motivation Loops in Your Questas Worlds”, is a great companion read.
Keeping Visual Continuity Without Losing Your Mind
Simulating camera moves only works if your images feel like they belong to the same world. Otherwise, every “pan” looks like a teleport.
We’ve talked about using AI as a continuity editor in “AI as Continuity Editor: Keeping Plot, Canon, and Visuals Aligned Across a Questas Series”. Here’s the short version tailored to camera moves:
1. Lock a Visual Bible for Each Location
For every major location, keep a tiny checklist:
- Style: e.g., semi-realistic watercolor, noir comic, clean 3D render.
- Palette: 3–4 core colors you mention repeatedly.
- Lighting: harsh fluorescent, soft twilight, golden hour, torchlight.
- Camera defaults: Is this place usually seen from eye level, low angle, or high angle?
Repeat these phrases in your prompts so the AI has a consistent target.
2. Use Repeated Anchors in Prompts
When generating “adjacent” shots (pans) or zooms:
- Name the same objects: “the same neon sign,” “the same cracked marble floor,” “the same rusted railing.”
- Mention the same character details: clothing, hair, gear.
This repetition helps the model understand that you’re staying in the same space.
3. Embrace Imperfect, Story-First Continuity
Absolute frame-perfect continuity is less important than emotional and narrative continuity.
- If a shot is slightly different but stronger for the story, keep it.
- Use your text to smooth edges: “Hours later, the lab is a mess…” explains why the room changed.
The goal isn’t to build a forensic 3D reconstruction. It’s to make the player feel like they’re in a coherent, living place.
Designing Camera Moves for Accessibility
Camera tricks can be exciting—but they can also be disorienting if you’re not careful.
If you want your quests to welcome more players (and you should), consider how your simulated camera moves land for:
- Players with motion sensitivity or vestibular issues.
- Players using screen readers or relying heavily on alt text.
- Players who process visual information more slowly.
A few practical tips:
- Use clear, descriptive alt text for each image that reflects the “camera move.”
- E.g., “Wide shot of the entire market square at dusk” vs. “Close-up of the merchant’s hands counting coins.”
- Avoid rapid-fire, high-contrast cuts in sequences that must be read quickly.
- Give visual transitions a narrative cushion. One or two lines of text that orient the player can make a big difference.
For a deeper dive into inclusive design patterns for interactive stories, check out “Accessibility-First Quest Design: Building Questas That Welcome Every Player”.
A Simple Blueprint: One Scene, Three Moves
To make this concrete, here’s a small blueprint you can use as a template for any pivotal scene in Questas.
Scene: Negotiation at the City Gates
1. Establish (Wide)
- Image prompt: “Wide shot of ancient city gates at sunrise, a small delegation approaching along a dusty road, guards on the walls, warm golden light, painterly style.”
- Use as the intro scene image.
- Text: Set context, stakes, and who the player is.
2. Approach (Pan + Medium)
- Image prompt: “Medium over-the-shoulder shot from behind the player’s character facing the city gates, guards visible ahead, same sunrise light, painterly style.”
- Use as the choice scene.
- Choices:
- “Approach confidently and demand entry.”
- “Offer a gift to the gate captain.”
- “Try to slip in with a merchant caravan.”
3. Consequences (Cut + Close-Up)
-
For a bold demand:
- Image: close-up of a guard’s narrowed eyes and hand on spear.
- Style and lighting match previous shots.
- Text: A terse response; maybe tension spikes.
-
For a generous gift:
- Image: close-up of hands exchanging a small ornate box, city gates blurred behind.
-
For a sneaky attempt:
- Image: low-angle shot of boots slipping into shadow near a wagon.
Even though you never moved a camera, the player experiences:
- A wide establishing shot.
- A pan forward into the scene.
- A cut to a close-up consequence.
You’ve directed a short film beat—inside an interactive branch.
Bringing It All Together
You don’t need a camera crew to think like a director.
With AI-generated images and a visual, no-code editor like Questas, you can:
- Use shot types (wide, medium, close-up) as prompt templates.
- Simulate pans by shifting focus across a shared environment with overlapping details.
- Simulate zooms by progressively tightening your framing on the same subject.
- Use cuts—match, smash, jump, and cutaways—to shape energy and emotion around choices.
- Maintain visual continuity through consistent style, lighting, and repeated anchors.
- Design these moves in ways that support accessibility, not fight it.
Once you start seeing your quests in terms of camera language, your branches stop feeling like a stack of disconnected screens and start feeling like scenes in a living, breathing world.
Your Next Step as a “Camera-First” Quest Director
You don’t have to rebuild an entire saga to try this.
Here’s a lightweight way to start, ideally in your next work session with Questas:
- Pick a single pivotal scene in an existing or planned quest.
- Design three shots for that scene:
- One wide establishing frame.
- One medium shot for the main choice.
- One close-up consequence image for at least one branch.
- Regenerate images with explicit shot language in your prompts.
- Wire them into your quest so the player experiences that visual rhythm.
- Playtest with 2–3 people and ask only one question: “How did that moment feel?”
From there, you can start layering in pans across locations, more intentional cuts between branches, and micro-video moments to punctuate key beats (for that, “Micro-Video, Macro Impact: Using AI-Generated Video Moments to Punctuate Key Choices in Your Questas” is a natural next read).
If you’re ready to direct your first camera-move-rich quest, open up Questas, pick a scene, and design your first intentional wide → medium → close sequence. Your players may not have the words for what changed—but they’ll feel it.